Graphic Design and Illustration.

Posts from the ‘Illustration’ category

Image of the Month – August 2013

August_2013A


Following the recent success of my first Artist Trading Card and it’s journey through geocacheland, I’ve decided to make a follow up. My previous card is supposedly on it’s way to Europe! And all I thought the card would do was float around geocaches in central Manitoba or Northern Ontario. I’d like to think I was the first person to combine Artist Trading Cards and geocaching, but as with all things, the Internet kinda beat me to it. A lot. But it is still kind of great that the experiment greatly exceeded my expectations.

This one is a little more detailed than the last. Keep in mind, this is a business card sized painting, so detail is kind of at a premium. As with the last one, I started off with a very large pencil drawing, scanned it into the computer, where I scaled the image to size and then printed it out onto textured linen inject paper. I printed out a whole bunch to a sheet just in case I made a serious mistake and had to start over. I then finished off the image using mostly acrylics, with a bit of pencil crayon and some marker for added detail.


Here are a few snap shots showing step by step how my image came to be.


A Prussian Blue acrylic wash was used for an underpainting. I like to used complimentary colour to establish value on my underpaintings.

A Prussian Blue acrylic wash was used for an underpainting. I like to use a complimentary colour to establish value on my underpaintings.


After all the acrylic work was done.

After all the acrylic work was done.


A bit of pointillism with a fine tip Sharpie to add a bit more contrast and help define some shapes.

A bit of pointillism with a fine tip Sharpie to add a bit more contrast and help define some shapes.

Image of the Month – June 2013

20130625-212348.jpg
This month, I tried out the app, Ideas, from Adobe. It’s a vector drawing app for the iPhone/iPad. The app was free when I downloaded it about a month ago. I am not too sure it still is. I didn’t have much time to use it before, and I find the whole “finger painting” just doesn’t do it for me. But for Father’s Day I got a rather nice stylus so it was time to put this drawing app thru its paces.

First off, the iPhone make for a rather small canvas. You can zoom in quite a bit and hide most of the interface which was a big help. And drawing with a capacitive touch stylus isn’t quite the same as drawing with a Wacom stylus or even a real pen. Since capacitive touch screens are designed with a finger in mind, the surface area of the stylus is a bit large. Means trying to connect up different lines you’ve drawn is kinda hard to do. Either long, deliberate strokes or short sketchy lines seem to work best.

Oh, and a quick warning. There’s no revert feature. If you screw up a drawing, it might be difficult to get back to a place where you left off. I’d suggest you always work from a copy of you file rather than the actual file. That way if you screw up royally, you can always go back a copy. I understand 3D people and web people are used to working this way. You also have up to 10 different drawing layers. Doing different parts of a drawing on a different layer might also help with a lack of revert to save.

The drawing tools are pretty basic. There’s a pencil, brush, and marker tool. You can adjust colour, opacity, and brush size. I was wanting some larger brushes. There’s also a paint bucket tool to fill in large areas with colour.

Once done, you can share the image on Facebook, Twitter or email a PDF. I think it can also save your drawing to Creative Cloud if you have it (I don’t). The PDF it generates is huge. The art board was almost 60 inches square! The file was also RGB so print guys beware. Converting vector RGB to CMYK can be a messy affair. The complexity of the file wasn’t too bad. This drawing of my son I made generated quite a few shapes and a lot of anchor points, but was still somewhat acceptable.

Enjoy.


Find out more about Adobe Ideas here:

Adobe Ideas on the iTunes Store

Adobe’s John Nack’s blog

Some really great artwork examples


Not the Momma!

Not the Moma 01

WIP sketch dedicated to my son, Aiden. He has gotten better at being around his Dad, but the first few days, we did have a few “Not the Momma” moments! Luckily, he can’t hold a frying pan… yet!

Original sketch was recorded using a Wacom Inkling. A little bit of colour quickly thrown in Photoshop. Might finish this guy up this weekend for my Image of the Month.

Enjoy.

Elephant

Elephant

Yeah, I know it’s a rhino.

There’s quite the story behind this image. It’s an older one. I did this drawing for my high school art class when I was 17 years old (I’m now 38). A friend of mine who was taking art classes for an easy credit was rather disgusted with how accurately and realistically the image came out and kept calling it an elephant instead of a rhino. The name stuck.

When I was first finished the image, I wasn’t too thrilled with how it came out. There are some problems with the proportions, and it was bugging me, but the graphite was too ground into the paper for me to do anything about it. It took me years to finally decide it was a good piece. My parents’ on the other hand, liked it right away and put it in a large frame (the drawing itself is a full size piece of mayfair cover, approximately 18in x 24in in I believe) and mounted it on a ledge that ran across our front entranceway. A few years later it fell the nine feet to smash on the main floor. I thought for sure the drawing was going to come out of the frame in ribbons. It did not. Though it DID have a few good gashes going through it in a few places. You won’t be able to notice them on this digital capture.

I decided to post the drawing here. The mayfair cover is getting quite old and has yellowed noticeably. I don’t think the original is going to last that much longer. A quick snap shot and some photoshopping to deal with the yellowing and voilà, here you go.

This is the very last pice of my older and sometimes more juvenile works that I’ll be posting online for the sake of completeness. You can see the rest of these works here, here and here.

Image of the Month for April

April_2013

Well April’s Image of the Month is a bit late (and the one for March is non-existant), but I’ve got a pretty good excuse. My wife gave birth to our son, Aiden, a bit earlier than planned. And as any parent can tell you, the first few weeks of a baby’s life is pretty disruptive. Especially for first time parents.

And in keeping up with that thought, the image I made for this month was a little acrylic painting I did for the baby room.

Hopefully, I’ll be adding some more content soon!

Enjoy.

Image of the Month – February 2013

Head
Just in the nick of time. A little 3D model of a human head. I wanted a base model for a head (that I made for myself) that I could then use to try out the Sculptris software. Sculptris is basically ZBrush light. Very light in fact. But it has an intriguing feature set, and the price was right. The model was built in Blender 3D.

Happy Groundhog Day!

Groundhog_2013

Or soon to be Groundhog Day. I haven’t been able to post all week as I have been quite ill. Since I’m not congested at all, it is pretty safe to say it isn’t the flu, but whatever it was, it was not good.

Since it seems everyone is gearing up for Groundhog day (as my blog is being bombarded for Groundhog Day clipart requests) I thought I had post another image for this year.

He’s not as cute as the last guy, and not quite as clip-arty either, so I am not certain he’ll be quite a successful as last year’s, but he was fun and quick to draw. Doesn’t look like he’s seen his shadow quite yet, but I’m not holding my breath for a quick end to winter as it is -29 degrees Celsius with a wind chill that makes it feel like -41 outside! For the metric impaired people reading this, -41 degrees Celsius is pretty close to -41 degrees Fahrenheit, I believe.

Now if you’ll all excuse me, I have to go outside and brave this cold!

Wacom Inkling Review

Inkling

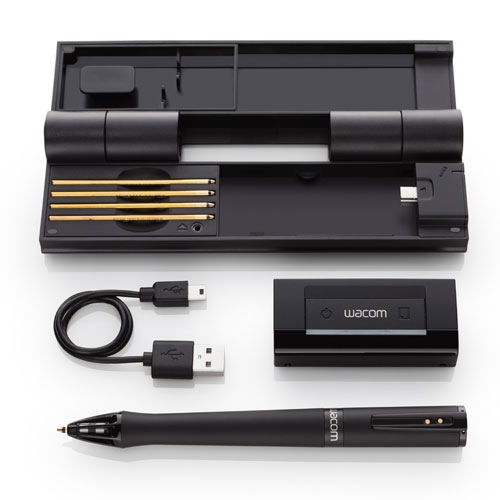
This past Christmas my wife surprised me with a really intriguing gift‚ Wacom’s new(ish) Inkling. It’s a pressure sensitive pen that can be used as a normal pen for sketching on a pad of paper. If the included receiver is clipped onto your paper, it will record all your strokes and play them back as either a Photoshop file or as vector artwork that can be edited in a program such as Illustrator.

The Inkling is charged through a mini USB cord (provided) and takes about 3 hours for a full charge and is good for about fifteen hours of drawing. The receiver also stores all the drawings and basically acts like a USB thumb drive when connected to your computer. I haven’t tested it out, but is is reported to hold hundreds of sketches and I have no reason to disbelieve it as the sketch files were rather small.

The pen itself is a standard (though rather fat) ballpoint pen. It comes with a few refills but uses standard ink cartridges so finding cheap refills shouldn’t be a problem.

I was pretty excited to get one of these. We tried to get one last year when they first came out, but they were very, very hard to come by.

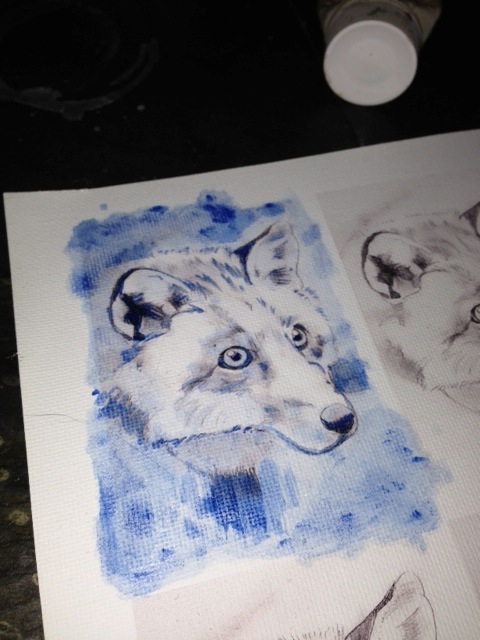
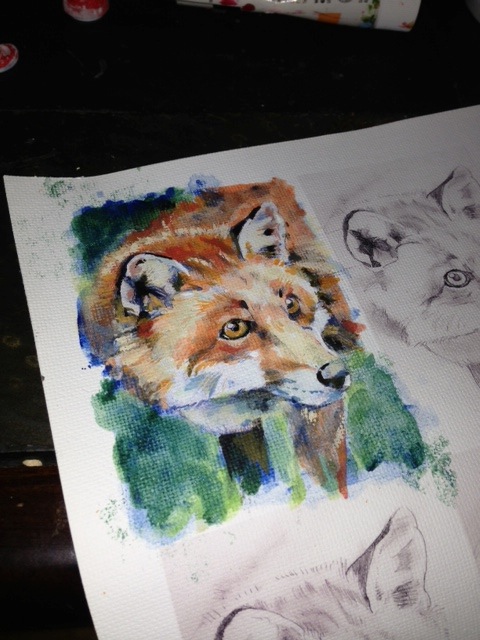
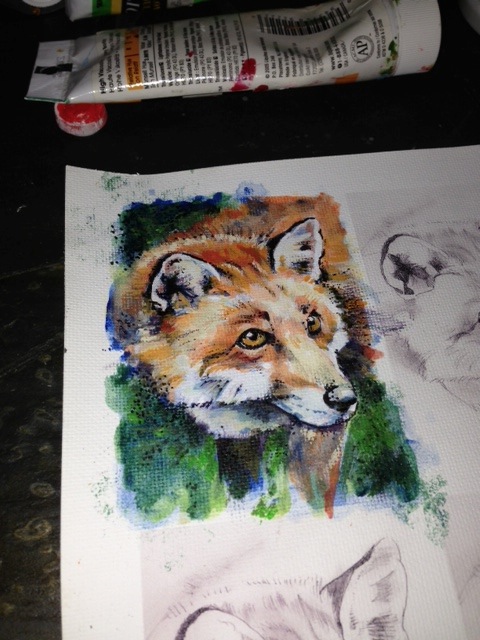
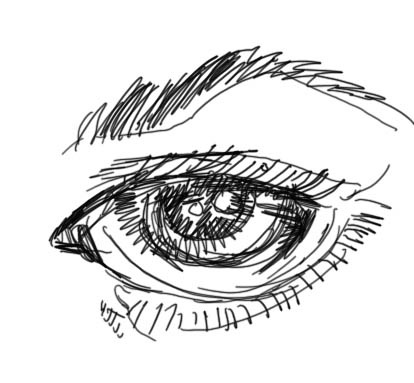
Below you’ll see a few tests I managed to find the time to make. I didn’t bother to show the original sketches for a side by side comparison. Quite a few people have already done so, and I want these sketches to stand by their own merit.
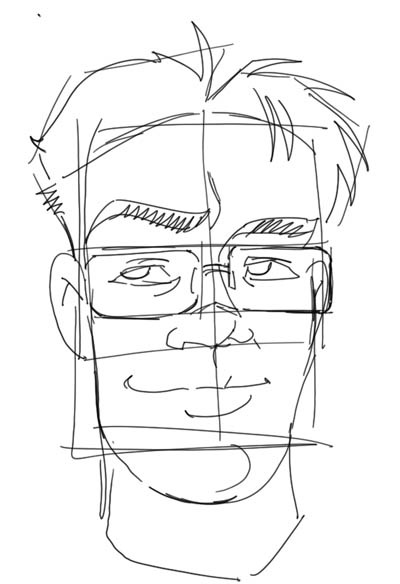
Another_Face Face Face_Profile Eye Cat Anime Face

My impressions.

Since it’s release, the Inkling has got some pretty mixed reviews. People either love it or hate it. I personally thinks it’s great, but it does have a few limitations.

The first one, is accuracy. The lines recorded can sometimes float around a bit. It gets worse the further away your line work is from the reciever. This is where most people complain. The Inkling is not a replacement for a Wacom tablet or Cintiq. It’s great for sketching out rough ideas on the go, but people who like very tight, clean lines and are hoping to skip the scanner altogether will be disappointed. People like myself, who like to quickly sketch out ideas and then refine them on the computer will find the Inkling is exactly what the doctor ordered.

I would imagine it would also do well for people who have a fairly loose and sketchy style of drawing.

A few things to watch out for.

As mentioned already, the recording of the line work is not super accurate. Drawing over the same line again and again may produce wildly variable results. Large, deliberate strokes seem to work best.

Also, the pen can go to sleep if not used right away, or if you take a long pause. Once this happens, you might wind up drawing strokes the receiver won’t pick up. A good indication of this is the top of the pen. It should be glowing slightly if the pen is awake. A light on the receiver should also be glowing every time you make a stroke. If you think the pen is asleep, just make certain you give a solid tap with the point of your pen onto your drawing surface. That should wake up the pen. I assume this is to conserve power.

And now for the bad.

The software that comes with the Inkling blows. Big time. The user interface is poorly thought out and hard to understand. Though, the ability to playback little videos of your drawing taking shape was cool. Good luck trying to find that feature though. And to make matters worse, for some reason, the software will automatically boot up on startup. I work on a Mac and it’s not a login item. Instead, it strews out all kinds of files hidden in various parts of the OS. I never could deactivate that “feature” and wound up deleting the software. The good news is Autodesk Sketchbook Pro can open up the files stored on he Inkling device. Even better, Sketch Book Pro has some customizable brushes and it is a simple matter of getting your sketches redrawn using these brushes. Which is more than I can say regarding the Photoshop export option the Inkling software has. All the samples you see in this post were done in Sketchbook Pro.

Before I deleted the offending software, I tried the vector output settings. I’ve never really been impressed with using freehand drawing movements with either a mouse or stylus for vector lines. Vectors are great for geometric shapes or objects with carefully plotted out points. Freehand or more organic shapes, not so much. Pixel based software always seems superior when it comes to that sort of work. The Inkling seems to follow this rule. The vector output was not quite as good as the bitmap (Photoshop) output.

So to recap, the Wacom Inkling is a great sketching on the go tool that can quickly get your sketches on the computer. The software that does all the magic needs lots of work on Wacom’s part to be useful. I’d recommend Autodesk’s software instead. It’s more flexible and has some very interesting drawing tools in its own right. Just make certain that in the program’s preferences you change the canvas size to something other than 100 DPI if you want to work with larger resolution files. The Inkling records everything at 600 DPI.

I definitely, plan on using this guy in my workflow. I can now sketch out my ideas anywhere I want (my specialty), and I can get then quickly into the computer. And depending on the particular style or effect I want, I can leave them exactly the way they are or refine the sketch with more precise drawing tools (the computer’s specialty).

And it also means more time with my wife and future family, and less in front of the computer! [Wacom Inkling Digital Sketch Pen]

January Image of the Month, 2013

January_2013

First Image of the Month for 2013. Final render of the dinosaur 3D model I’ve been working on. Quite a bit of work cleaning up the image in Photoshop. Mostly adjusting some colours, and adding in a bit of a background.